In the realm of academic publishing, author identification plays a crucial role. The integration of ORCID IDs into the Open Journal Systems (OJS) enhances author credibility and article visibility. We’ll guide you through the process of connecting an ORCID ID to an OJS journal, ensuring a seamless experience for both authors and journal managers.
Understanding ORCID in OJS #
ORCID provides a persistent digital identifier that distinguishes authors and allows them to connect their ID with their scholarly work, thus ensuring proper attribution. When connected to an OJS journal, it enables a streamlined publication process.
For Authors: Adding ORCID to Your Profile #
Step 1: Obtain an ORCID ID
To get started, authors who don’t have an ORCID ID yet should register at the official ORCID website. This process entails providing personal and professional information to create a unique ORCID record.
Step 2: Log into Your OJS User Account
Access the journal’s website and log in using your credentials.
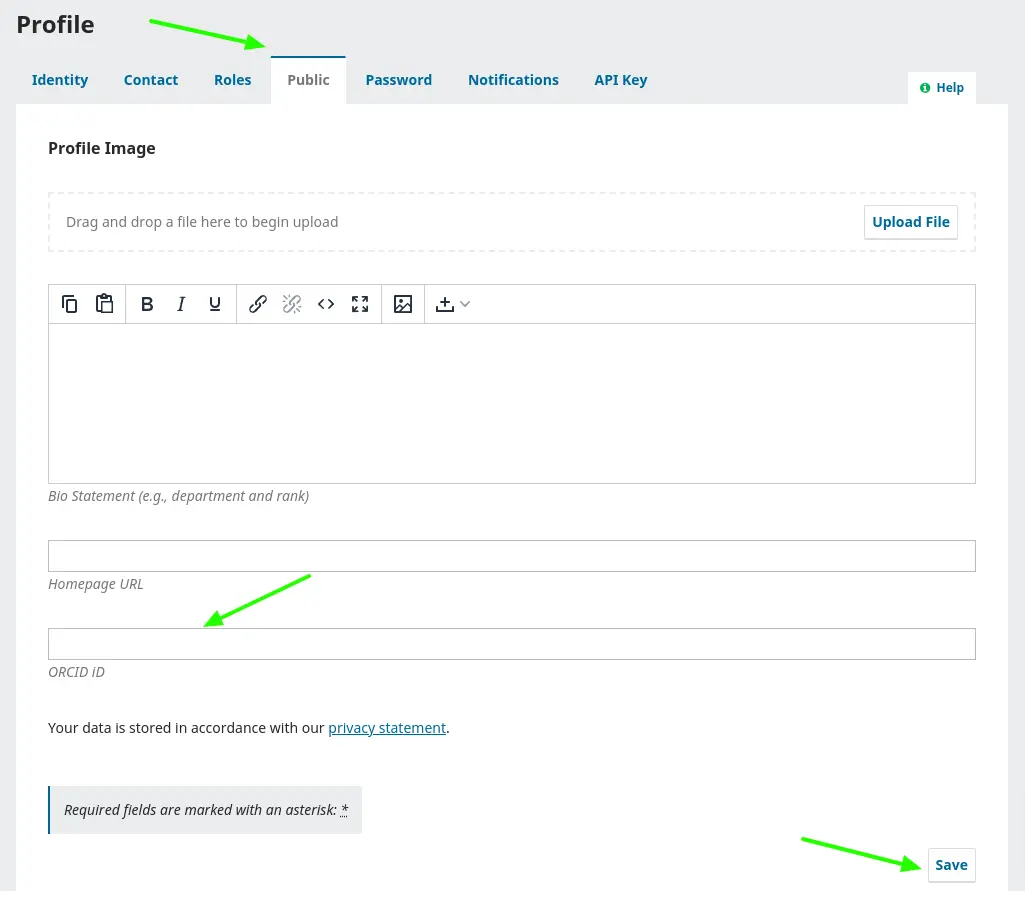
Step 3: Update Your Profile
Navigate to your profile section and look for the option to edit your profile.

Step 4: Enter Your ORCID ID
Locate the ORCID field and manually enter your ORCID ID.

Step 5: Save Changes
After entering your details, save the changes to your profile.
For Journal Managers: Assisting Authors with ORCID Integration #
Step 1: Educate Your Authors
Ensure that all authors are aware of the importance of integrating their ORCID IDs by including this information in the author guidelines.
Step 2: Collect ORCID IDs
With the authors’ permission, collect their ORCID IDs for manual input.
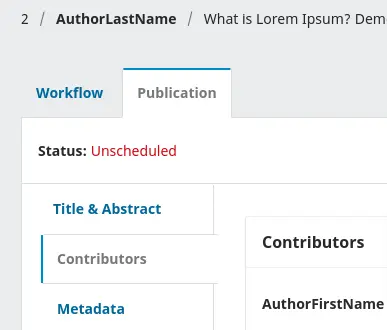
Step 3: Navigate to the article in the OJS backend
- Go to the “Publication” tab.
- Access the contributor menu within the publication.
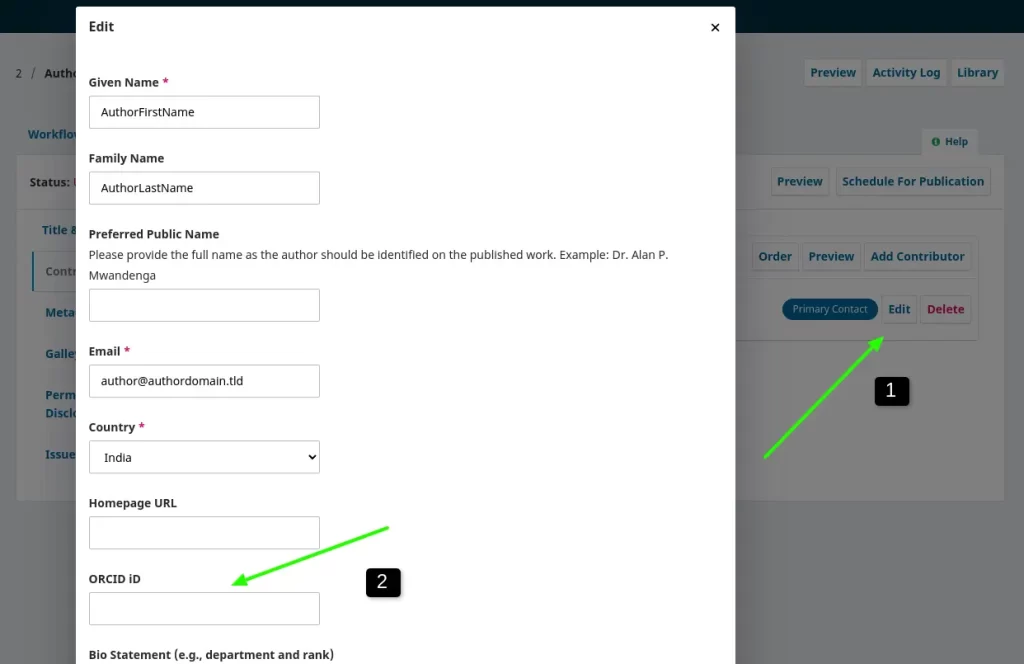
- Click on “Author Edit.”

Step 4: Now, proceed to add the ORCID record:
- Insert the ORCID information in the designated field.
- Save the form to ensure the changes are applied.

Step 5: Verify and Confirm
Confirm that the ORCID IDs are correctly displayed on the author’s profiles and articles.
Using the ORCID Plugin #
Step 6: Send ORCID Authorization Request Emails
Journal managers can leverage the ORCID plugin to send targeted emails to authors, prompting them to authorize their ORCID records within the journal system. To ensure the effectiveness of this communication, it is crucial to verify that the OJS email system is functioning correctly. If there are issues with the email system, authors may not receive the communication. Therefore, it is recommended to confirm the proper functionality of the OJS email system to guarantee the successful delivery of authorization requests to authors. For OJS email problems, contact our technical support for assistance.

Step 7: Track Author Responses
Monitor which authors have authorized their ORCID records and follow up if necessary.
Displaying ORCID on Published Articles #
Step 8: Ensure Correct Metadata Display
Confirm that your OJS setup is programmed to display ORCID IDs on article pages.
Step 9: Manage Article Metadata
When publishing articles, include the ORCID IDs in the metadata so that they appear with the publication.
Our Professional Services #
Our firm offers a suite of services to enhance your academic journal’s digital presence:
- Journal Website Design: Tailored web design solutions that embody the essence of your academic publication.
- OJS Upgrade Service: Ensure your platform is utilizing the latest features and security enhancements.
- OJS Support: A dedicated team ready to assist with any technical or operational queries.
- Advanced Integration Services: We provide expert plugin installation and API configuration services. For more information, click here.
Conclusion #
The connection of ORCID records to an OJS-based journal is an essential step in preserving the integrity of scholarly communication. This guide lays out a straightforward path for authors and journal managers to achieve this integration. For complex technical support, including plugin installation and API settings, our firm stands ready to assist. Our team is dedicated t


